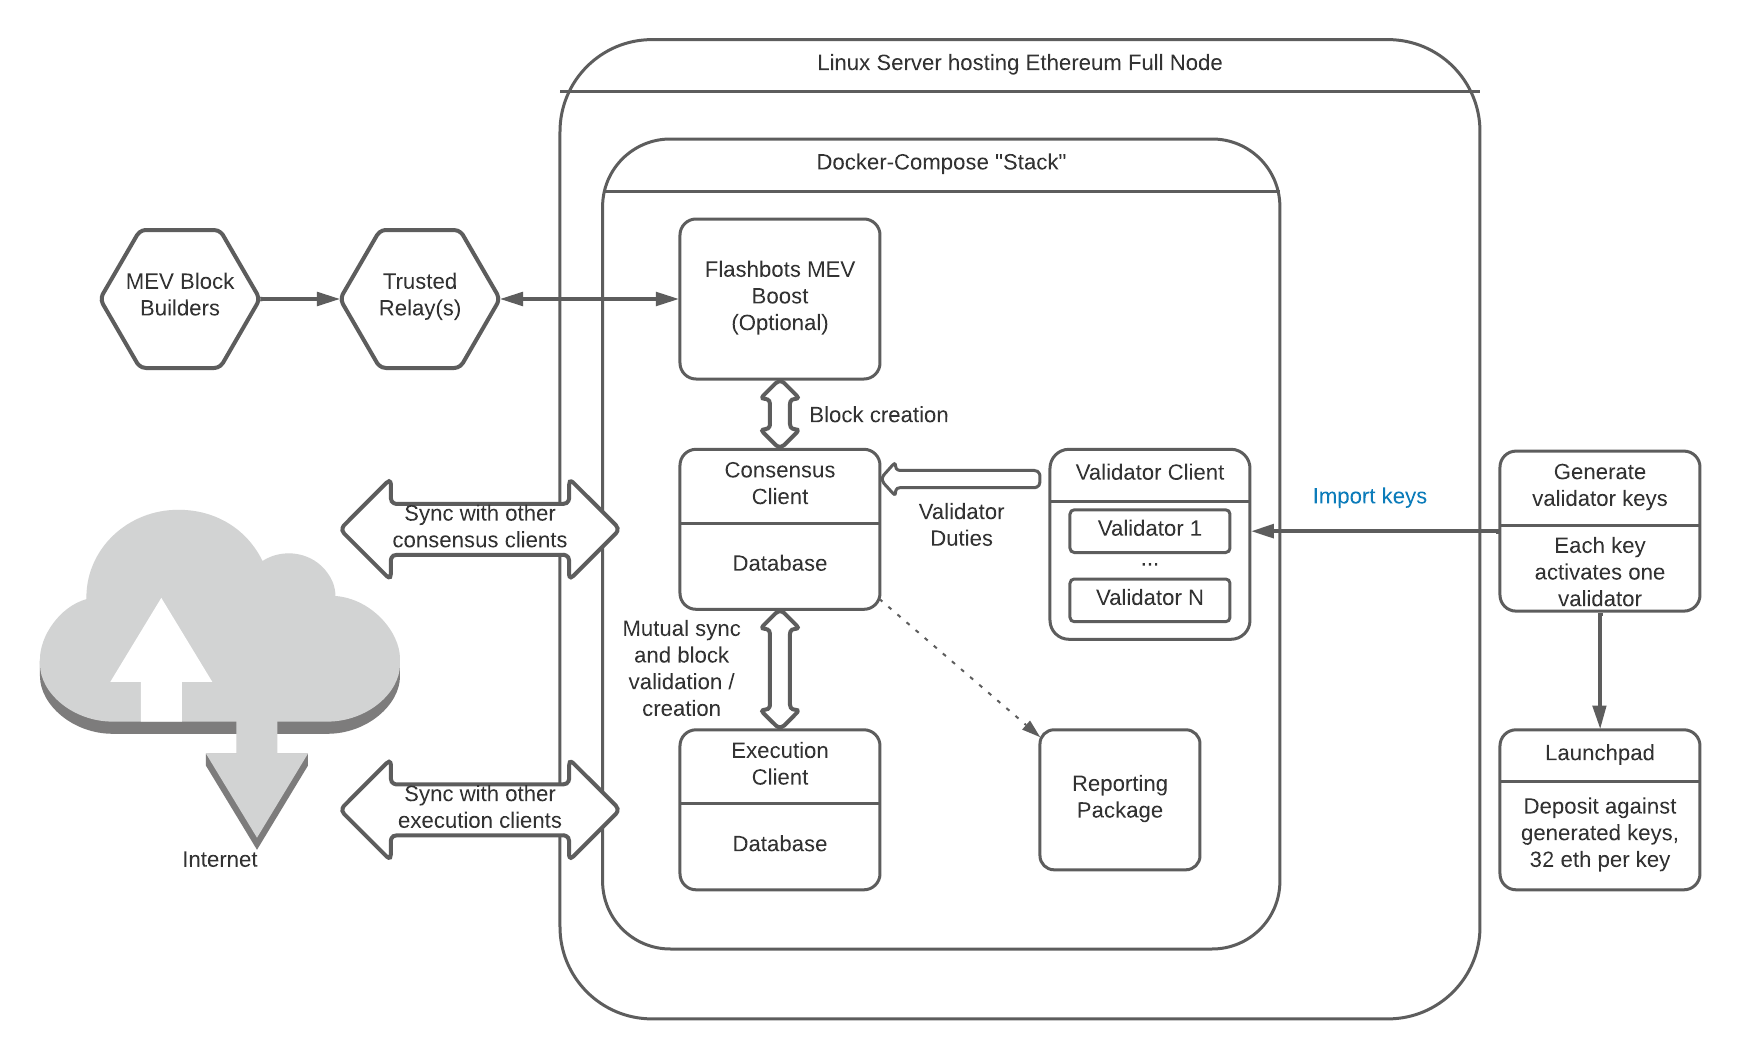
High Level Overview.
This project
Eth Docker aims to make running an Ethereum staking full node simpler than setting everything up manually, while allowing the user choice when it comes to the exact client mix they wish to run. It's the "easy button" for home stakers, with full control for advanced users.
Recommended hardware, whether your own hardware or a VPS, is:
- 32 to 64 GiB of RAM - 16 GiB works but can be challenging depending on client mix
- 4 to 8 CPU cores
- 4TB "mainstream" SSD - TLC and DRAM.
Getting started
After installing Linux, either Debian or Ubuntu, please take a look at the Quick Start instructions.
If you wish to use a separate drive for Ethereum data, please check how to tell Docker to use a second drive.
macOS and Windows users should start at the Prerequisites.
Node components
An Ethereum staking full node has many moving parts. Here's a high level, conceptual overview.

The original naming conventions were "eth1" for the execution client, and "beacon" for the consensus client. You will still encounter these names in several places, particularly in the logs of the consensus client. Ethereum PoS (Proof-of-Stake) was also called Ethereum 2.0 at one point, but uses the same ETH token.
Eth Docker feature highlights
- Supports all FOSS (Free and Open Source Software) Ethereum clients in any combination: Lodestar, Nimbus, Teku, Grandine, Lighthouse, Prysm; and Nethermind, Besu, Reth, Erigon, Geth
- Runs on Linux or macOS, Intel/AMD x64 or ARM or RISC-V CPUs
- Supports running Ethereum nodes, staking or RPC, on Ethereum and Gnosis Chain; supports running ssv.network DVT nodes; supports integration with RocketPool in (reverse) hybrid mode
- Supports Grafana dashboards and alerting, either locally or Grafana Cloud or even your own remote Mimir/Thanos cluster
- Uses official client teams' images, does not publish its own images
- Supports advanced use cases such as exposing interfaces over https with traefik secure web proxy, or source-building clients locally
Guiding principles:
- Reduce the attack surface of the client as much as feasible.
- Guide users to good key management as much as possible
- Create something that makes for a good user experience and guides people new to docker and Linux as much as feasible
Staking workflow
When setting up an Ethereum staking full node, you'll:
- Configure and run consensus client and execution client and sync them with testnet or mainnet
- Generate validator keys. This can and often is done outside of the machine used to run the node, for security reasons.
- Validator keys can be distributing (type 1) and hold 32 ETH, or accumulating (type 2) and hold 32-2048 ETH.
- Consensus layer rewards go to the unchangeable "withdrawal address" set when generating the keys; execution layer rewards go to the "fee recipient address", which can be changed at a whim.
- Import validator keys into the validator client, each validator key activates one validator
- Once the Ethereum execution client and consensus client are fully synced with the chain, deposit Ethereum at the launchpad.
Here's what then happens:
- The chain processes the deposit and activates the validators: Your validators start earning rewards and penalties.
- The consensus client is where it all happens: Block generation, attestations, slashings, with the help of the validator(s) inside the validator client, for signing.
- A validator earns a reward for every epoch (6.4 minutes) it is online, and a penalty of 3/4 that amount for every epoch it is offline. "Online" means that it sent its scheduled attestation / block proposal. This means you want to be online almost 24/7, but do not have to be afraid of a few hours of downtime, with the exception of periods of non-finality.
- Greater 2/3 of validators need to be online for the chain to "finalize". If the chain stops finalizing, far harsher penalties for offline validators kick in. Stay online during non-finality. The initial penalties on main net for this "inactivity" during non-finality have been reduced to 1/4th of their eventual values.
- "Slashing" is a penalty and forced exit for malicious validators; regular penalties could be described as "Leaking" instead. The most likely mistake that gets you slashed is to run a validator key in two separate validator clients simultaneously.
- If all of the above was so much Gobbledegook, you may want to read the EthStaker knowlege base and come back to it every time you have questions.